For monochrome images : it enables contrast and brightness enhancement. For 16 bits images, it uses a non-linear image processing algorithm, according to the DICOM standard. (Check the part 3 of the C.11 DICOM standard for more detailed information).
Enables transparency. When mouse is moved toward the left, transparency will increase, where as a left movement will reduce the transparency.
Add a color table to grayscale images. Two color tables are available :
The image is selected when a right-click is performed on the image. Then drag it with your mouse. It will be moved according to the mouse movements.
The image is selected when a right-click is performed on the image. Then drag it with your mouse. It will be scaled according to the mouse movements. When mouse is moved toward the bottom, the image size increases, whereas an upward movement decreases the size.
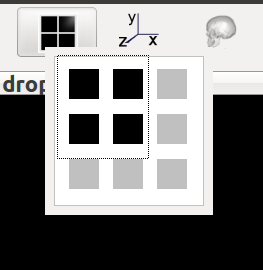
When pressed, the user can select the number of windows displayed, from 1x1 to 3x3 windows. The selection of the windows is performed with the mouse (see below).
When pressed, a blue set of cross lines are displayed on the DICOM images. The intersection point corresponds to the actual position in the three views of the volume (sagittal, axial and coronal view).
When toggled, the blue cross lines are displayed. When unchecked, the blue cross lines are hidden but the user keeps the ability to navigate through the DICOM volume when is toggled.
Creates or modifies the link to the database. The path to the database is stored for future use.
Typically, standard DICOM files are associated with a file named DICOMDIR in its root directory. The DICOMDIR file store paths to DICOM files on the media. The DICOMDIR is a DICOM Object holding a sequence of nodes, each having a type like PATIENT, STUDY, SERIES or IMAGE. Sometimes nodes are incomplete or corrupted. This function will restore some of the missing attributes according to the DICOM standard.
It is highly recommended to anonymize the data stored in the database to prevent loss of medical or confidential data. JIMBO offers a tool to remove personal information from the headers of images. This software goes through all the images metadata dictionary and proposes to replace personal data the most commonly associated with DICOM images. By default, the following headers, if present, are deleted:
These items are highlighted in green in a full-sized table. The fourth column of the table can be edited to change the content of the DICOM header. Any changes will be highlighted in green in the table. The cell background stays painted in white if no change is made.
When this icon is toggled, a dialog window enables to parse existing files stored in the computer. The user is invited to choose the repertory where the DICOM images are stored (USB key, CD-ROM…).
It is the easiest way to load DICOM images in the database. When a CD-ROM is inserted, and if it contains a DICOMDIR, the DICOM images will be automatically downloaded and stored in the database when the user press this icon. Before doing this action, the user must wait for the CD-ROM is recognized by the operating system (Windows or Linux), otherwise, JIMBO will tell that no DICOM image is present in the CD-ROM.
When pressed, enables to :
When this icon is selected, the current windows are hidden and the database is displayed (see use the database for more information).
When pressed, a file containing this document is displayed.
When checked, the sagital, coronal and axial view of the volume are displayed according to CA-CP orientation (CA = anterior commissure, CP = posterior commissure). The axial view is parallel to the CA-CP line and its vector normal is parallel to the CA - interhemispheric scissure line. To be effective, CA/CP/VB/VU CA must have been previously selected. The coordinates of these points are stored for future use and is displayed in a table named “Coordinates, world and Leksell reference planes”.
When this icon is checked, the oblique reslicing mode is activated. This mode is activated when the right mouse button is pressed. See “DICOM volume reslicing for more informations”.
The user can manually unchecked this icon to go back to the initial view of the volume.
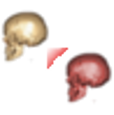
When checked, shows the entry point and the target point of surgical devices (eg: depth electrodes). On the left side, the points are colored in red (bright red for the target point, pale red for the entry point). On the right side, the points are colored in green (bright green for the target, pale green for the entry point). See “how to set target and entry point” for more information. This function is deactivated when an oblique reslicing is performed. This function is intended to be used when CA-CP points are set. See “Set CA CP reference points” for more information.
When checked, it informs the user that the 3D mode is activated.
When checked, it informs the user that the 2D mode is activated.
When checked, it activates the 3D rendering mode. Several options are available. See “3D rendering tools” for more information.
When this icon is checked, a table is displayed. Each row displays a registred volume dataset. When a specific row is double-clicked, the chosen volume dataset is displayed in the foreground with a slight transparency effect.
Access to the User ...
JimboDICOMViewer
User’s manual apr-2015